Привет друзья!!!!
Hello my crafty friends!!!
Я очень-очень рада сообщать про начало нашего СП!!! Сегодня вдохновляю вас на этом этапе я, а другие девочки ДК позже покажут вам свои творения! ;)
I am super excited to let you know about the beginning of our JP!!! I will be inspiring you today with my work and tutorial to it, and the DT girls will be showing their projects later this week! ;)
 Все подробности СП и правила участия читаем ТУТ!
Details about the project and the rules can be found HERE!
Вот моя открыточки для Этапа 1: Штампы + Эмбоссинг
Это кое-что новенькое для меня, думаю и для вас тоже ;) Вдохновляйтесь и творите!!!
Here's my card for Week 1: Stamps + Embossing powders
This is something new for me and I think for you too ;) Get inspired and create!!!


With this card I would like to enter:
- Challenge #81. Bloom. Addicted to CAS challenge blog.

Я надеюсь, вы дочитали до конца, и что мне удалось показать вам что-то новое и вдохновляющее! Если вам понравилось, жду ваших коментариев и вопросов, если таковые возникли ;)
Hello my crafty friends!!!
Я очень-очень рада сообщать про начало нашего СП!!! Сегодня вдохновляю вас на этом этапе я, а другие девочки ДК позже покажут вам свои творения! ;)
I am super excited to let you know about the beginning of our JP!!! I will be inspiring you today with my work and tutorial to it, and the DT girls will be showing their projects later this week! ;)
Details about the project and the rules can be found HERE!
Вот моя открыточки для Этапа 1: Штампы + Эмбоссинг
Это кое-что новенькое для меня, думаю и для вас тоже ;) Вдохновляйтесь и творите!!!
Here's my card for Week 1: Stamps + Embossing powders
This is something new for me and I think for you too ;) Get inspired and create!!!


Эта открыточка полностью выполнена в технике горячего эмбоссинга, и если вам интересны подробности, то приглашаю далее посмотреть и почитать мой МК ;)
This card is fully made with hot embossing, and if you are interested in detail of how to make one, I'm inviting you to see my photo tutorial below ;)
Этот МК я дублирую с блога Cherrylana Designs в свой блог, чтоб написать версию на английском языке. ;)
This Tutorial is copied from Cherrylana Designs challenge blog, where I posted it earlier, and I decided to copy it here with English translation of it for you! ;)
Для работы я подобрала:
-всевозможные разные пудры для эмбосинга,
-чернила VersaMark от Tsukineko и маркер Emboss it от Ranger ,
-пудра антистатик,
-белый кардсток,
На самом деле когда я начинала работу у меня была идея о том, что я буду делать, но я не видела конечного результата... поэтому мне не все понадобилось, что на фото... так бывает ;)
For work I used:
-various embossing powders (ZING: silver and gold with glitter; Ranger: gold, WOW: Opaque Primary Sunny Yellow and Primary Luscious Lime.)
-VersaMark ink by Tsukineko and Emboss it pen by Ranger
-antistatic powder
-white cardstock
When I started working on this card, I didn't see the final result, though I had this idea of coloring with embossing powders, so I haven't used all the stuff I have in the picture... it happens ;)

Берем белый кардсток и прорабатываем его пудрой антистатиком.
First I worked through the cardstock with my antistatic powder.

делаем оттиск цветочка чернилами VersaMark
I stamped a flower with VersaMark ink

посыпаем пудрой (в данном случае я взяла золотую с глиттером, чтоб больше блеска ;) ) и запекаем феном.
then put some powder (I took a gold one with glitter, the more shimmer, the better ;) ) and baked it with a heat gun.

Внимание! Работаем аккуратно, чтоб не оставлять отпечатков пальчиков на кардстоке, либо же проходимся антистатиком после каждого слоя! ;)
Далее мы штампуем листики, посыпаем пудрой, запекаем, и добавляем ножку, при этом листик можно прикрыть масочкой. Ножку тоже запекаем феном.
Attention! Work carefully, trying not to leave any finger prints on the cardstock, or, work through the paper with your antistatic powder after each layer! ;)
Next I stamped a leaf, put powder and baked it, and also added a stem (covering the leaf with a mask) and also baked it with my heat gun.

Вот такой цветочек у нас получился. Далее его можно раскрасить карандашами, красками, чернилами вобщем тем, что у вас есть, но я решила пойти дальше и раскрасить цветок пудрами ;Р
Here is our flower. Next you can color it with pencils, paints, inks, or what ever you would prefer, but I decided to go further and color it with embossing powders. ;P

В этом мне поможет вот такой маркер для эмбоссинга и цветные пудры, которые уже ооочень долго ждали своего часа)))
Here's what's going to help me color my flowers. It's the Emboss it pen and these colorful powders, that's been waiting for a looong time to be used)))

Проработав поверхность антистатиком, мы аккуратно закрашиваем лепесточки этим маркером и посыпаем пудрой.
Внимание! Постарайтесь не касаться маркером золотых контуров, чтоб пудра не прилипла к ним, нам же важно чтоб их было видно ;) И еще изучите свои пудры, ведь некоторые плотные (как эта желтая, она opaque), а некоторые полупрозрачные (далее увидите салатовая)
I again work through the surface with my antistatic powder, and carefully start covering the petals with this embossing pen.
Attention! Try not to touch the gold contours, so that your powder won't cover them, as we want to see them clearly ;) Also I advise you to learn your powders, as some of them are solid (like this yellow opaque one) and others are half transparent (you'll see the light green further)

Посыпав цветок желтой пудрой (НЕ запекаем), мы прокрашиваем маркером листики и посыпаем зеленой пудрой (опять же НЕ запекаем, ведь мы еще не закончили)
After I covered the flower petals with yellow powder (I DON'T bake it), I'm working on the leaves and the stem with my pen and cover those with light green powder (I DON'T bake it yet)

Видите, у нас еще остались пустые места, чтоб добавить интереса в этот раз я взяла золотую пудру (она темнее и однороднее чем золотая с глиттером для контутра), посыпаем, и только когда все посыпано, в один заход запекаем.
As you can see we still have some empty places, to add some interest I took a gold powder, which is darker and more solid than the gold one used for contours. Only when we covered it all with powders we bake it!

Внимание! Если вы решили раскрашивать цветок пудрой, то на этапе запекания контуров имейте ввиду, что сами контуры надо только немного "припечь", чтоб пудра не сдувалась, но не до конца! Потому, что когда вы будете запекать внутреннюю часть, контуры могут поплыть или вздуться... Чтоб этого избежать, помимо недозапечённых контуров, необходимо так же двигать феном равномерно все время, чтоб он не останавливался в одном месте на больше чем 1 секунду... Так контуры останутся выпуклыми и сохранят форму. Опять же пробуйте, и тестируйте свои материалы, ведь факторов влияющих на результат очень много (толщина и гладкость кардстока, пудра, мощность фена, да даже мощность в розетке ;) )))
Вот наш цветочек ;)
Attention! If you have decided to color your flower with embossin powders and not inks, or paints, Be sure to not bake the contours fully, let the heat catch the powder, so it can't be blown away, but don't bake it fully! Because if you do, and then start baking the inside of the flower, your contours can "bleed" or smear from the heat, or get bubbly... To avoid that, leave the contours not fully baked and move the heat gun slowly all the time and don't stop at one spot for more than 1 second. In this way the contours will stay fit and in shape. Again, test your materials, as many factors influence the result (thickness and texture of your cardstock, powders, even the power of your heat gun)))
Here's my tulip ;)

Таких я "напекла" целый букетик и вырезала аккуратно маникюрными ножничками...
I have "baked" the whole bunch of flowers and cut them with my mini scissors...

Вот теперь я подбирала композицию, и решала как будет выглядеть моя открытка... Я решила оформить букет в окошко, чтоб спрятать хвостики... Букетик пока отдыхает в сторонке. Вырезаю в подложке окошко ножами от MFT.
Now I have decided on the composition and know how my card will look... I thought to put the flowers into a circle window to hide the stems... I used MFT stiched circle die to cut the window.

Выкладываю букетик, подбираю надпись, присматриваюсь, мне нехватает чего-то, цвета или теней... Поэтому решено было на основе затонировать круг нежным розовым цветом дистресс чернил (spun sugar) с помощью апликатора.
Looking at the white cardstock, I feel that something's misisng, and I need some color... So I decided to tone the circle with soft pink (spun sugar) distress ink with the help of ink blending tool.

После этой фотографии я добавила еще немного цвета тем же образом, и начала собирать открытку. Цветы я приклеила универсальным клеем на основу, и некоторые на вспененный скотч, саму панельку я тоже приподняла с помощью скотча. Верхней панельке я тоже добавила завершенности немножко затонировав края тем же образом. Добавила золотую нитку и надпись сделанную черной пудрой. Все... ;) Нежно, ярко, фактурненько и объемненько)))
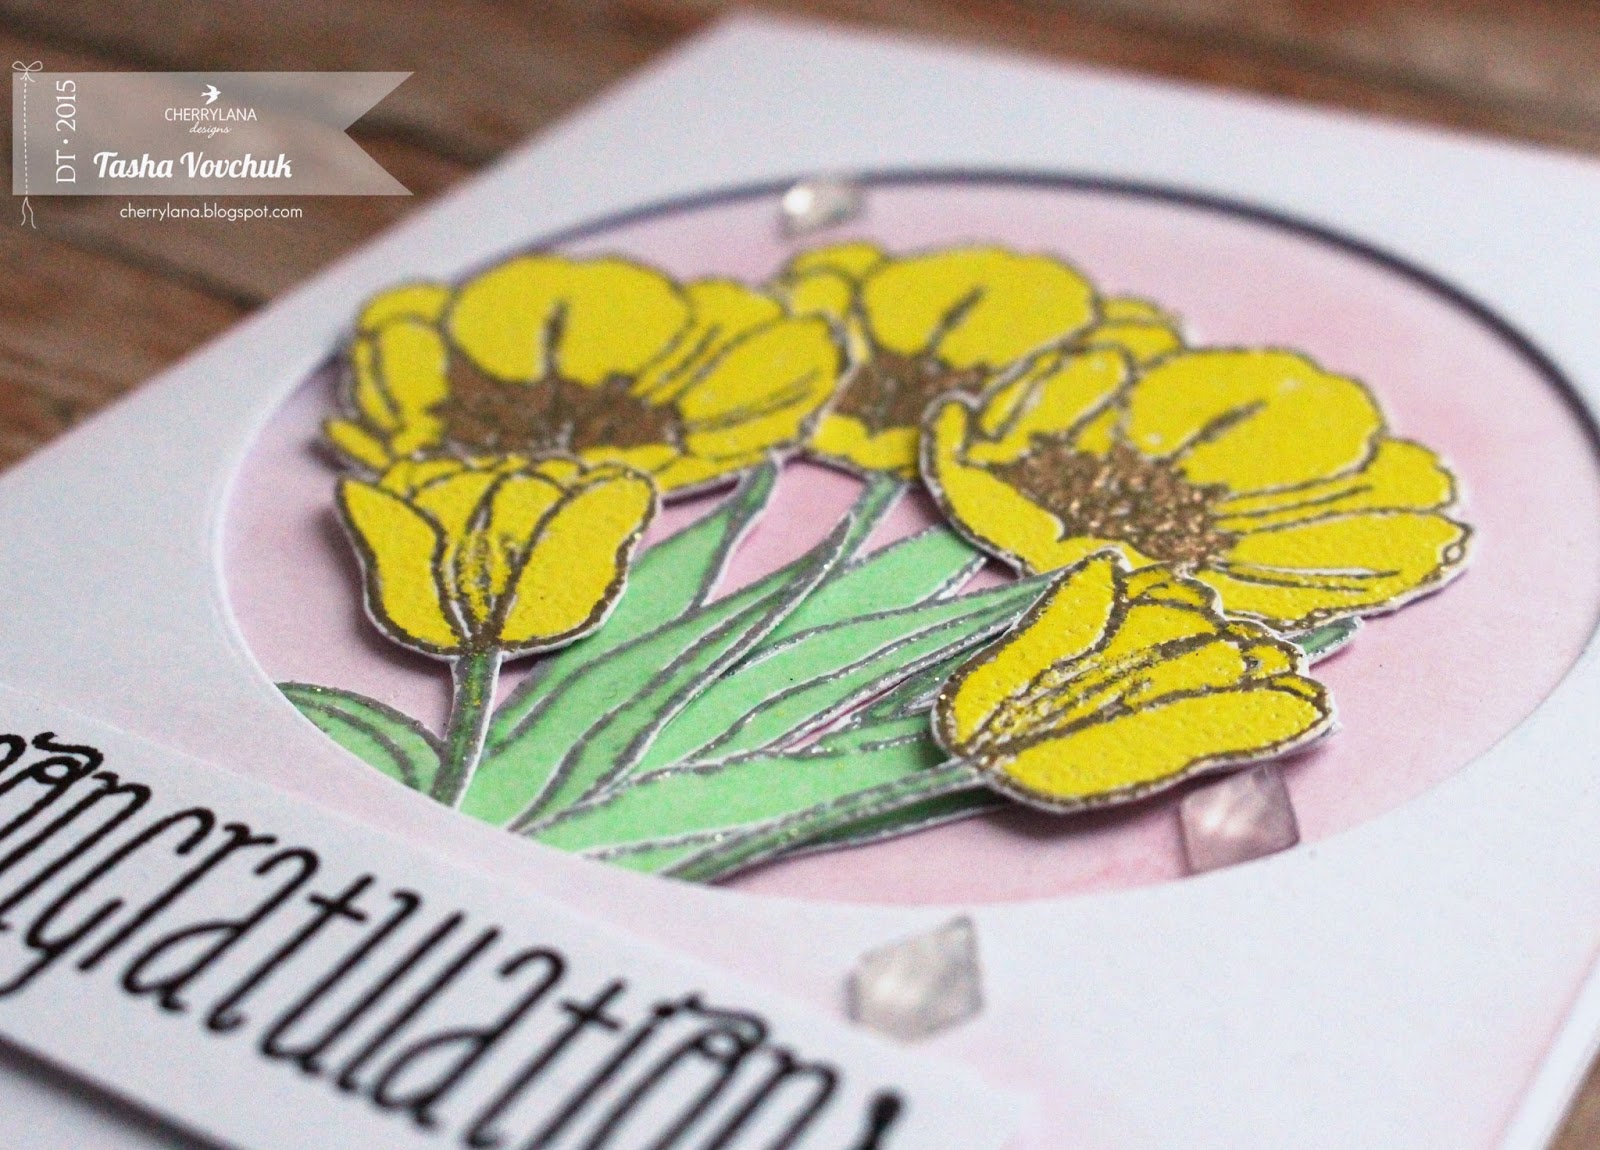
Смотрим детальки
After this picture was made, I added some more color to the circle on the base of a card, and started to gather the card. I glued the flowers to the base, and some of them including the upper panel I put on the foam adhesive. I also added some pink distress inks to the edges of the upper panel, it looks more complete this way. Added some gold thread and the sentiment baked with black powder by Ranger. Tha's it... ;) Soft, bright, with texture and some volume))))
Let's see the details closer

With this card I would like to enter:
- Challenge #81. Bloom. Addicted to CAS challenge blog.

Я надеюсь, вы дочитали до конца, и что мне удалось показать вам что-то новое и вдохновляющее! Если вам понравилось, жду ваших коментариев и вопросов, если таковые возникли ;)
До скорой встречи!!!
I hope you read it till here)))) and that I showed you something fun and inspiring! If you liked my idea and tutorial, I'll be happy to see your comments ;)
See you soon!!!
Wow...what a great idea to heat emboss the entire card. Thanks for sharing at ATCAS!
ОтветитьУдалитьBeautiful flowers and stunning design! Thanks for sharing your step by step tutorial with us! And...Thanks so much for playing along with us this week at Addicted to CAS!
ОтветитьУдалить